The ultimate house for Pi
Raspberry Pi’s are fantastic – but when you want to use them in a standalone application that requires some kind of display and a keyboard with maybe some extra USB ports and access to the LAN port then things can get a bit messy.
You'll need to find a housing and a display and figure out some way to keep everything connected and hide all the wires and decide where to store the keyboard when it’s not being used and then how to keep all the various power supplies for the Pi, the display, the speaker amp and the USB hub from being unplugged three months down the line.
And this often ends up looking like the pictures below.
![]()
There are a number of great looking housings on the market but nothing that is specifically designed to house your Pi and make it look like a finished, all in one desktop style product with a built in screen, keyboard and speakers and access to the communication connectors that Pi provides.
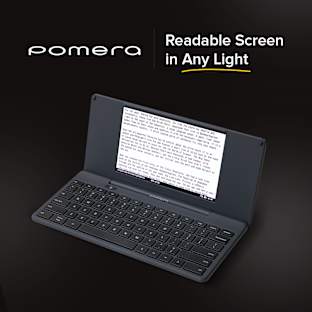
Imagine then your Pi, almost as an appliance, standing on a desktop or counter. It’s beautiful and neat in white and grey with a brilliant 7” (800 x 480) HDMI LCD display angled perfectly for viewing.
It is unobtrusive but big enough - the size of an open A5 booklet with the screen filling the top half and the spill proof and washable keyboard filling the bottom half.
It’s your energy monitor or your home automation system, your internet of things manager or your ZX Spectrum, your media player or games console, the instant messaging device that you give to your parents, or your weather station, or pretty much everything else that a Pi can be. And now on top of it – it’s really nicely packaged too.
![]()
PiKasa is the ultimate Pi housing that can be used initially for Pi versions 1 and 2 and the A, B and B+ versions of these and in our next release, also for the Pi Compute module.
So how does it work ?
PiKasa is a really high quality injection molded ABS housing that has the following already fitted :
-
7” (800 x 480) colour TFT LCD with HDMI interface
-
Keyboard with a splash proof silicon rubber keymat overlay and 4 hotkeys aligned to the screen
-
Interconnect board that has a built in 12v to 5v power converter, Li-ion battery charger, USB hub (to give you 5 external USB ports), LAN hookup, audio hookup with onboard amplifier and loudspeakers, Raspberry Pi power hookup and HDMI interface circuitry to drive the LCD
-
Carrier bracket to hold your Raspberry Pi inside the housing
All you need to do to get your PiKasa powered up is connect the internal cables on the interconnect board to your Raspberry Pi, press fit your Pi onto the internal HDMI connector and fit two holding screws to retain the Pi in the correct position.
![]()
Then replace the back cover, connect power and switch on the device at the integrated power switch and your Pi is an instant appliance, running whichever applications you have loaded on your SD card.
What we need and What you get
We need to upgrade the LCD technology and hardware platform of one of our exisitng products that we deploy to provide content and controlled internet services to schools in South Africa.
To be able to do this we need to be able to afford the tooling changes needed to the injection molding tools as well as the implementation of the new hardware platform for all the content that is now available.
By creating PiKasa, we hope to be able to get the support needed to make these changes and at the same time be able to offer a really nice, world first product to the Raspberry Pi community.
![]()
Our perks are all based around the Pikasa product and we are offering some really fantastic discounts for everyone that jumps in early to support us.
So how did this come about ?
For the last few years we have been deploying a product into some South African schools that we call Streetwise. Have a look at www.thecontentcompany.co.za for some ideas on what we have been doing.
The technology that we developed about 5 years ago was developed in my previous company which sadly had to shut down just as Streetwise was almost ready to launch. I took over the IP and the product and my small team completed the development that was needed to launch the product into the market where it has been used very successfully at a small number of schools around the country.
The technology that we originally used was based around a monochrome 5” LCD and connectivity was provided via GPRS to cater for the lack of 3G services at the time. We now need to update our technology to cater for more cost effective colour TFT LCD’s as well as the far superior onboard content and connectivity that is now readily available.
To do this, our strategy is to first see if there is a enough of a need for PiKasa (the standalone Pi appliance housing), and if there is, then use this as the mechanism to make the changes needed to the injection molding tools and the changes needed to our hardware to be able to create the next version of our product.
If we can get enough support for our Pikasa project then not only will we be able to afford the tooling changes needed to bring this great housing to the market, but we will also be able to upgrade the technology in our Streetwise product and take this great educational project to the next level.
This means that the potential impact of this project is huge, not only for the Pi community but also for the 20,000 plus schools in South Africa that have zero connectivity to the internet or the great educational content freely available.
The state of play
We have built a working prototype in order to prove the concept and test that everything can be fitted into the housing as anticipated.
We have also been able to confirm the appropriateness of the 7” LCD and check that it provides a great display quality in terminal mode as well as when running a full graphical interface (OS or Application).
![]()
The changes needed for the tooling have all been designed in principle and have been discussed with our tooling and plastics manufacturing partner in Hong Kong (we have a 10 year working relationship with them).
We have selected a partner to work with for the supply of the LCD and we have sourced the HDMI controller circuitry and components needed for integration onto our PCB.
![]()
We have designed the individual blocks of circuitry needed for the USB hub, power supply and control, battery charger and onboard audio and have been able to fix the physical locations of the various connectors and pushbuttons needed.
The hook up cables to connect the Raspberry Pi to our interface board have all been defined and specified and have been put out for quoting.
And lastly we have designed the changes needed to our current keyboard PCB and sourced the components required for it to operate as a standard USB device.
The campaign will end around the middle of April 2015 and if we are successful then we intend to immediately start implementing the hardware design of the PiKasa interconnect PCB (that the Raspberry Pi will be fitted to) and the changes needed to the injection molding tools for the new LCD.
![]()
We have a lot of experience with taking products through the development and manufacturing process over the past 25 years and we do not expect any problems with this project, although the timeline is tight and does not cater for any unforseen delays.
All going according to plan, we will be shipping in August 2015 and you can expect to receive delivery of your PiKasa housings in early September.
The plastic components are manufactured in Hong Kong by a company we have worked with for over 10 years. Most of the electronic components are sourced from suppliers in the USA, Europe and China and the everything is manufactured, integrated and tested in South Africa at our world class third party manufacturing partners.
For final product delivery to your door, we will be using a fulfillment partner in the USA as well as in Europe or other regions if needed as this will be more reliable and will cost less.
Other Ways You Can Help
If you aren't in a position to purchase one of our fantastic PiKasa housings but can appreciate how it can be used to turn your Pi into a beautiful product or stunning appliance, then please use the Indiegogo share tools to tell your friends and other Pi community members about our project.
Frequently Asked Questions
Here are a few questions and answers that we think will be useful. If you have any other questions or comments or suggestions then please feel free to contact us.
1 : How does the Raspberry Pi connect to the LCD ?
Through the HDMI port on the Raspberry Pi. We have an HDMI connector on our PCB and a driver chip and circuitry to drive the LCD directly from the HDMI port. This way, you don't lose any I/O's and you get superb HDMI quality on your 7" LCD.
2 : Will my config file need changes ?
In most cases you will need to add a few lines to the config file to setup up the display function correctly. We will make these available to you.
You will also need to change your audio output settings to force the audio to use the stereo jack and not the HDMI plug.
3 : Will it work with all models ?
It will work with all models (Version 1 and 2 and Models A, B and B+). It will not work directly with the Pi Compute module but later we will release a version that can be used with this module.
4 : Is there a product spec sheet available ?
Yes, in the Image Gallery there is a document image with the basic product specification.
5 : Must I always add shipping ?
Yes please. We have different rates for different areas of the world.