Introducing tinyLiDAR
The Time-of-Flight Sensor that Everyone can use![]()
What is LiDAR?
Have you heard of LiDAR? Chances are that you probably have. It’s fast becoming the new buzzword in the news lately. It’s the cool new tech that can be found in all sorts of new products like driverless cars, drones and even smartphones.
So what is it? LiDAR stands for "Light Detection and Ranging" and if you Google it, you’ll find a bunch of references to long range airborne surveying systems. That was the old-school LiDAR. Today’s LiDAR is much more compact, lightweight and lower power so its finding its way into many areas that were unimaginable in the past.
LiDAR works just like RADAR but instead of sending out high frequency radio bursts, it uses infrared laser light.
Professional LiDAR systems like those used in autonomous cars incorporate ultra-fast Analog to Digital converters, rotating platforms and high-end optics so they’re generally not very hobbyist friendly. Fortunately, for those that don’t need the ultimate in ranging distance and measurement speed, there are simpler and lower cost options.
The Big Idea
Like all innovative products, the idea for tinyLiDAR came along the way of building something else. Some time ago, we had a need for an accurate, low power and inexpensive proximity sensor. Ultrasonic sensors were our first choice but we found them to be inaccurate, slow and power hungry. Furthermore, we found the published specs to be misleading for many of the low cost ultrasonic sensors sold online. The new VL53L0 laser time-of-flight sensor from ST Microelectronics also seemed to fit the bill nicely. It was well engineered and field proven in over a quarter of a billion devices shipped worldwide. However, after digging a bit deeper, running the demos and immersing ourselves in the ST PAL API, we quickly found that using it was going to be anything but simple - and then it hit us…
![]()
What is tinyLiDAR?
tinyLiDAR is a miniature (about the size of a US Quarter) laser distance sensor module that's super easy to use thanks to a dedicated ultra low-power 32-bit microcontroller. Using ST's official API along with our custom firmware that we wrote from scratch, this microcontroller translates simple I2C commands from any host to the more complex real-time interactions necessary for controlling the new VL53L0X time of flight sensor from ST Microelectronics. Unlike other generic VL53L0X sensor boards, only tinyLiDAR allows low level controller boards like the Arduino Uno to run this sensor at full performance and without using any dedicated sensor libraries.
![]()
![]()
A distance reading sketch on the Arduino Uno using tinyLiDAR takes only 2604 bytes of program storage space vs 6480 bytes using the Pololu VL53L0X library with a generic VL53L0X sensor board. Also, this same sketch will need only 252 bytes of dynamic (RAM) memory using tinyLiDAR vs 414 bytes with library+generic board solution.
![]()
tinyLiDAR is only half the size of the PING))) ultrasonic sensor.
Why did you develop tinyLiDAR?
We wanted a "simple to use" distance sensor that was well engineered, low power, accurate and low cost. The new VL53L0 from ST looked promising as it was already field proven in over a quarter billion phones around the world. But it was too complex to use - so we decided to change that by writing a custom operating system on a dedicated microcontroller that could translate all of the tough tasks into simple I2C commands. We also decided to calibrate each sensor after assembly so now it’s a perfect fit for any distance sensing task up to about 2 meters.
![]()
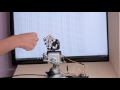
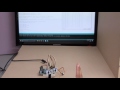
How do I control it?
Controlling tinyLiDAR is simple and the code snippet below shows just easy it is even on an Arduino Uno. Note that you can use any microcontroller that has a free master I2C port so its not just limited to Arduinos. You only have to issue simple I2C commands such as "D" to read the distance in mm. No calibration is required as we do this before shipping and its stored in non-volatile storage. Of course, you can re-calibrate the module if you want to and our reference manual tells you all about it along with other commands you may want to use.
Download the reference manual from our website at tinylidar.com and also check out this short video for our very useful Command Terminal Demo sketch:
Arduino Connection and Example Sketch
Hooking up tinyLiDAR is quick and simple - you only have to wire it up to the I2C port and feed it power and ground. Makers rejoice! We've already spent countless hours to make the tinyLiDAR Fritzing part for you :) You'll be able to download this from our website at the end of our campaign. Back us now...
![]()
Here is a very simple Arduino sketch for tinyLiDAR. More sample sketches will be provided on our website at the end of our campaign.
// ----------------------------------
// Read Measurements from tinyLiDAR
// ----------------------------------
#include <Wire.h>
void setup()
{
Wire.begin();
Serial.begin(115200);
}
void loop(){
//limit speed for low power single-step mode
delay(42);
//send the read distance “D” command
Wire.beginTransmission(0x20);
Wire.write("D");
Wire.endTransmission();
//receive measurement data
Wire.requestFrom(0x20, 2);
int Distance = ( Wire.read()<<8 | Wire.read() );
//print it out
Serial.print(F("Distance (mm) = "));
Serial.println(Distance);
}
Why are you crowdfunding?
We have been working on the tinyLiDAR concept for quite a while now (see timeline below) and we've been successful in bringing it to a stable working prototype stage.
Your help is needed now to help us lower the cost of this sensor module for mass production so that everyone in the maker communities can benefit from this versatile little distance sensor at a reasonably low cost.
Every dollar counts so please help to bring this project to life by showing your support - back us now and spread the word to your friends - thank you!
Features
-
Advanced Technology: Eye-safe Vertical Cavity Surface-Emitting Class 1 Laser and Single-Photon Avalanche Diodes
-
Standards based: using the official VL53L0X API from ST
-
Advanced functions: including the automatic cross talk calibration to make the sensor work under glass
-
Fast: up to 60Hz sampling rate even with Arduino Uno
-
Accurate: to 3% with mm precision, pre-calibrated by us before shipping
-
Ultra-Low Power: 10uA typ Quiescent Current in single step mode
-
Long Range: up to 2 meters
-
Small Size: 21 x 25 mm
-
Light Weight: <1.5 g
-
Easy to Use: control with I2C commands (no library required)
-
Easy to Parallel: with user changeable I2C pull-up resistors
-
Dedicated uC: to abstract the ST PAL API into simple I2C commands
-
RoHS compliant: Lead-Free Assembly
- Integrated Level Shifter for native 3v to 5v operation
- Remotely re-configurable I2C board address and operation modes
- Non-Volatile I2C board address and calibration storage
- Several connector options including Grove, SMD/solder or standard 0.1 inch (2.54 mm) header pins
- Blue activity LED to show measurement activity
Dimensions
![]()
Preliminary I2C commands
D Read Distance
Read distance in mm from the most recent measurement
E LED Disable
Disable the on-board Blue LED indicator.
F LED Enable
Enable the on-board Blue LED indicator.
MC Continuous mode
Set tinyLiDAR to continuous conversion mode. This is the lowest latency and highest power mode of the module.
MS Single Step mode
Set tinyLiDAR to single step conversion mode. This is the lowest power mode of the module where it will take a measurement on demand only (using the D command) and stay in the lowest power state otherwise.
RESET Reset address
Reset tinyLiDAR to the default board address of 0x20. Please note, this command uses a special broadcast address of 0x00 to talk to any tinyLiDAR module connected to the I2C bus. Therefore only one module should be connected to the I2C bus for this command to work properly. After writing the default address to the non-volatile memory, the module will reboot.
R Change I2C address
Change the I2C address for tinyLiDAR. This new address will be written to non-volatile memory.
W Write VL53L0X configuration
Write new VL53L0X configuration parameters. Parameters are written in the following order: Signal Limit, Sigma Limit, Time Budget, VCSEL Period selection.
P Preset Ranging mode
Set tinyLiDAR to one of 4 Ranging modes: L,S,H,T as described below. You can also set to custom formats using the “W” command.
L: long range (LR) mode (up to 2m, 33ms)
S: high speed (HS) mode (up to 1.2m, 20ms)
H: high accuracy (HA) mode (up to 1.2m, 200ms)
T: tinyLiDAR (TL) mode (up to 2m, 20ms)
CD Auto-Calibrate Distance Offset
Perform Offset Distance Calibration on tinyLiDAR . Before using this calibration command, please set tinyLiDAR to Continuous, High Accuracy mode by issuing the commands “MC” and “PH”. ST recommends to use a distance of 100mm to a white target. Therefore, place a white target 100mm away from tinyLiDAR before running this calibration. Must specify calibration distance in mm. The new offset correction distance will be placed in non-volatile memory and used for all subsequent operations. This calibration takes about 10 seconds to run and the blue LED will flash during the calibration. You can reset to our factory defaults by executing the “RESET” command.
CX Auto-Calibrate Crosstalk
Perform Crosstalk Calibration on tinyLiDAR . This correction factor is typically not used as it is meant to correct for crosstalk from thin cover windows placed infront of the sensor. The tinyLiDAR module does not ship with a cover window hence it does not require crosstalk correction by default. Before using this calibration command, please set tinyLiDAR to Continuous, High Accuracy mode by issuing the commands “MC” and “PH”. ST recommends to use a distance of 400mm to a gray (17% reflectivity) target. Therefore, place a gray target 400mm away from tinyLiDAR before running this calibration. Must specify calibration distance in mm. The crosstalk factor will be placed in non-volatile memory and used for all subsequent operations. This calibration takes about 10 seconds to run and the blue LED will flash during the calibration. You can clear this calibration out by running the “RESET” command.
Q Query Settings
This command will dump the current tinyLiDAR module settings as follows -
- Current Preset Configuration: (HighSpeed/LongRange/HighAccuracy/Custom/tinyLiDAR /Unknown)
- Signal Rate Limit (in MCPS)
- Sigma Estimate Limit (in mm)
- Timing Budget (in ms)
- Pre Range VCSEL Period
- Final Range VCSEL Period
- tinyLiDAR Firmware Version
- ST PAL API Version
Original Concept
![]()
Timeline
![]()
Risks and Challenges
At this point, we do not anticipate any issues with shipping product according to the timeline show above, assuming we are able to meet the funding goal and there are no unusual delays in receiving the funding.
We will be in discussions with several different levels of contract manufacturers based on the response rate achieved from this campaign.
As with any electronic product, we maybe impacted by component shortages in the electronics industry. We will work diligently to rectify any such situation and inform backers of any delays.
Shipping
We will ship worldwide but maybe restricted to several countries. If in doubt, please ask us. Click here for a short list of countries that we know we cannot ship to.
Stretch Goals
Stretch Goal #1: to be Unlocked at $10K
Feature to Auto-Configure Multiple I2C Addresses
We have some high level ideas on this but need more head-scratching to bring them into reality.
Basically, the idea is to have multiple tinyLiDAR boards remain plugged into the I2C bus and then programmatically change their I2C addresses from Arduino without having to physically unplug and talk to them one at a time in order to issue the "r" command as is done currently.
Stretch Goal #2: to be Unlocked at $25K
Free Mounting Bracket Kit for each tinyLiDAR board
This is the same bracket we made for the "tinyLiDAR Radar" and "Follow Me" sketches.
It will be pre-cut to proper dimensions and will include screws + foam tape ready to mount to your servo.